Velvet Jacket
Samettitakki
Another jacket
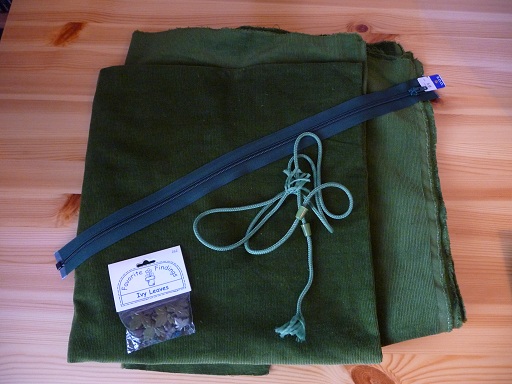
I've had some of the same green corduroy I used for the Velvet Skirt for quite some time. I bought it after finishing the skirt, because I just love the color. Didn't have any idea what I was going to make of it until a couple of weeks ago. A few months ago I made Mass Effect -jacket, which is a very form fitting uniform style jacket.
I decided I wanted to make a looser, more relaxed jacket out of the pretty green corduroy. I plan to add a hood to the jacket and some patch pockets to put my hands in (as they are very often ice-cold). Bought some cord to go in the hood plus a zipper. I am quite happy with the match, since I of course forgot to take a piece of the fabric with me. x)

I also found some really pretty leaf-buttons from my drawer. I bought them a while back also, with no idea what I was going to use them for. They were just too pretty. I think I might find a place for a few in this one. :)

Patterns
I already have one comfortable, loose jacket from Firefly. Me and strilla both bought the same jacket a couple of years ago on the same trip. Not regretted once (even though we do end up being "rättikaksoset" at times), the jacket has been my go-to all around spring/fall and a bit of winter jacket since then. However during the summer it is a bit too hot and sometimes I'd like bit less colours on my jacket. Also the smallest size was 36, when I am closer to 34.

So the plan is to use Firefly-jacket as base to draw patterns and then maybe make it a bit smaller. This is supposed to be a summer jacket, no need to fit a woollen sweater under it. :)
Drawing the patterns was quite simple, especially as I noticed the vertical cuts were just for the sake of the looks, both the front and the back are actually flat. Sleeves are made of 3 pieces (one on top, two on bottom), need to think a bit how I need to change the pieces if I plan to make the jacket somewhat smaller all around. There might be some extra adjustments needed. Hood will be in 3 parts too, two "normal" pieces and then a strip between them. I think I will make some changes to the collar, to make it lower.

Cutting
Paper sheet is so much thinner than my velvet, that I decided to do changes need with the actual fabric instead. Can more easily see how it works. I cut all the parts with 0,5 cm seam allowance, except for the pockets which got 1cm (and which I need to do again, I cut them the wrong way diagonally..). I normally sew maybe 0,7 cm from the edge: with my intention of making this jacket a size smaller than the one I used as a model it should be enough.

Sewing
I started by sewing the 3 parts of the hood and both sleeves together, zigzagging the edges and sewing the stitches that show from the right side. Then the shoulder seams, same deal.

When attaching the hood, I cut about 4 cm from its bottom, making the collar lower and the hood a bit smaller. I also cut 1 cm from the top of the collar part when sewing the strip to the inside edge of the hood.
I did the sleeves a bit different than in my previous three jackets (one in 9th grade at school, another corduroy jacket a few yars back and the ME-jacket): instead of first sewing the side seams and the bottom seam of the sleeves, I first attached the sleeves to the body and only then sewed the side and sleeves' bottom seams. So pretty much like a hoodie. It was much easier that way since the sleeves are not supposed to be tight fitting anyway.
I was going to get some ribbing for the sleeves, but didn't see anything that was both a) a good enough match colourwise b) thick enough. The Firefly jacket has some adhesive thingie (online dictionary wasn't helpful in this) and strilla suggested doing the sleeves the same way. Bad thing about this is that as I planned to use ribbing to add length to the sleeves, I have only 0,5 cm of seam allowance... Should be able to solve that one by just adding a strip of maybe 5cm at the end of the sleeve and sewing the adhesive thingie to that one. First I need to get some. And a 5cm longer zipper...
Got a longer zipper, a box of eyelets and some "hook and loop tape, for sewing on". First thing I did was hammer the eyelets (6 of them) on the hood. The thingie that was supposed to be used to make the holes for them didn't quite work on my velvet, so I used my trusty Victorinox instead. Be prepared! I also failed with one of the eyelets, it had a sharp edge that caught on the string. So I took that one out and used a darn stitch with a small piece of fabric on the other side. It does show a bit, but much better than string getting frayed or eyelet falling.


Next thing was sewing the zipper and the flap to the inside for a neater look. After I had that done, I didn't like the result and decided to use a thin strip on the outside to hide the zipper (the color is slightly off) and then use bias binding to neaten the inside. In the end I skipped the bias binding and just zigzagged the inside edge. Sewn-out zigzag actually looks quite neat on as is. I think this is exactly what I did with the ME-jacket (flap, bias, zigzag), maybe next time I will skip the additional stages and just go with the zigzag from the start. x)

After the zipper, the next thing to do were the sleeves. Since I had no allowance to turn them, I added about 5cm long cuffs. I sewed two 8cm long pieces of the "hard" part of the hook and loop tape to somewhat longer doubled strips of bias binding and then added that to the side seam of the cuff, so it got attached when I sewed the seam. The "soft" parts I sewed to the cuffs and then turned the edges so that the hook and loop tape was near the edge. One cuff has maybe 1-2cm longer diameter but other than that they look ok.


Another place to use the bias binding was the neckline, where I sewed it partly by hand (edges near the zipper), partly using the machine. Nothing special about that, or in turning and sewing the hem.


Last thing I sewed on were the pockets. I used patch pocket pattern I have previously used for some hoodies, I like the shape I got with them. And with the pockets on, all sewing is done. Just need to glue on the ivy leaves, but that I will leave till tomorrow, when I can try to figure out how to use the hot-setting adhesive (kuumaliima) strilla lended me. :)
The glue turned out easy to use, but very fast to cool. Need to be really fast with it.


Apparently the jacket looks more like a hoodie than a jacket. Still fine to wear. Just need to get another string on the hem, so it doesn't look quite like a very short dress.

A string at the hem makes the jacket look a lot more like jacket. I also got two black thingies with two holes for the string and a locking system. The string comes from one eyelet, through the holes of the black thingie, then through another eyelet and I sewed the end at the backside on a seam. Neat and practical. :)

 After finishing and taking these pictures, I actually ended up switching the string in the hem to match the string in the hood. Looks better that way.
© 2011-2026 Peeta Kiikka | Template design by Andreas Viklund